While I am still very interested in messing with electronics in general, and Arduino powered recycled junk art work in particular, I have not been doing much of either lately.
Instead I have been spending a lot of time working on turning my uninsulated, unheated, drafty garage into a proper shop.
I have also gotten sucked back into the world of machine tools, and have been restoring an old South Bend 9" metal lathe. To that end I have a new blog, because... well just because.
I call it The Age of Industry.
I have not given up on abigmagnet, but I probably won't be back for a while.
Saturday, February 18, 2012
Friday, June 17, 2011
Squigaloo kickstarter
I generally don't post work related stuff here, but this is just too big for me not too!
For the last year or so my business partner Andy Lueck and I have been hard at work on Squigaloo, our collaborative storytelling startup.
Just this morning we launched our kickstarter campaign to raise some money so we can finish it off! I would love it if you take a minute to look at what we are doing, and (of course) to make a pledge!
Maybe if this works I will have a little more time for projects here :-)
Thanks!
Josh
Saturday, May 21, 2011
Making progress on fixing the south bend lathe again

Using some nice one part industrial enamel. It stinks but it goes on well with a brush and dries to a hard glossy finish. I am putting on two coats over a phosphate based primer, and although I see all the inconsistencies in the casting I have so far resisted the urge to break out the bondo. So far.
I am averaging about two parts a day, but the weather has just gone back to cold rainy, so I am going to fall behind.
The bed sitting to the right is going to be tough to clean well enough to paint, if only because it is so heavy that it is hard to manipulate.
The color is WAY off. It is really a nice dark blueish gray (instead of robins egg blue).
I have started YET ANOTHER BLOG just for this project
Saturday, January 16, 2010
SlowLight in Winter Lights show at Vermillion gallery
One of the best parts about being involved with Dorkbot is that it has kicked me into making some new sculptures. The Winter Lights show at Vermillion Gallery opened last Thursday and our piece was in it. Bob Gallup and I collaborated again with great results I built the physical platform and Bob handled the software (with his usual skill and aplomb). The piece uses a UV LED to draw vector patterns on a phosphorescent screen. It is controlled by an Arduino, with an Adafruit motor controller board to run the motors.
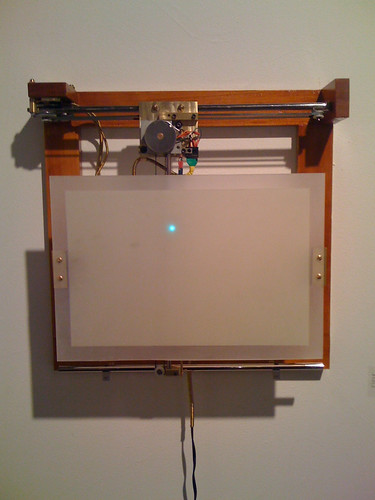
I am really happy with the way it turned out. The flotsam piece we worked on last summer was a bit of a compromise for me. I had not yet gotten the garage set up, and many of my tools and materials were still packed away. This time I had most everything out and ready to use. I treated this as an exercise in patience and intention. Every step was carefully considered, and if I screwed something up (which was often) I did it over again instead of hacking it together. I wanted to try and build something that looked as if it would have been right at home in an early laboratory, so that meant it had to look handmade, but also polished and "engineered". Every decision was made based upon functionality, and I tried very hard to avoid any kind of ornament or decoration. Although I would really have appreciated the milling machine I left in Philadelphia, I was pleasantly surprised with how much I could do just using my drill press, band saw, and hand tools.
I started by building a frame from scraps of reclaimed Douglas fir from a local architectural salvage place. I have completely fallen in love with stuff. It is everywhere out here, and I really enjoy working with it.
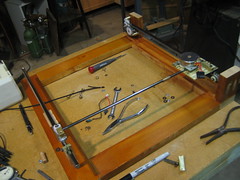
The next step was to start laying out bit and pieces of ink jet and scanner hardware. I was looking for a good pair of stepper motors that I could use as X and Y axis drivers. I have lots of these so it was not too hard to find two that would work together, I also dug out a pile of polished steel rods (also from printers and scanners) and some linear bearings that originally held the print heads of an ink jet.

The x-axis is almost a complete steal from an old scanner with the ink jet linear slide being the only addition. I made up a brass plate to ride on the x-axis and hold the y-axis motor and rod assembly. The y-axis is all custom made with bits and pieces from aho knows how many other machines. It was fun to machine up the various fittings I needed for keeping everything in place (even though I ended making many of them at least twice).

Brass was my material of choice as it is easy to work, and it looks great with the warm color of the Fir. I was initially very concerned with how to manage the wires. I considered lacing them, but in the end I made long brass springs out of fine wire and slid the wires through them. They look amazing (if I do say so).

All of the materials, and most of the screws and fasteners are from other things I have taken apart or collected. I think that at most I spent $30 for materials, much of it on the phosphorescent paint. A few coats of shellac gives the fir a perfect "old school" finish, and adds to the antique feel. Once done I turned it over to Bob to write the code. He managed to build quite a sophisticated system in just a few days. I will let him describe it (hopefully) but I know he took his inspiration from the old logo turtle graphics and built a parser that can read simple "programs" to draw the patterns. Here is a video he took at the opening, and if you are impatient skip ahead to about 1:11 to see it start drawing one of the 6-7 patterns it draws at random. Bob refers to this one as "triangle 90", but I call it "Iron cross". Bear in mind, it is called SlowLight for a reason...
I am really happy with the way it turned out. The flotsam piece we worked on last summer was a bit of a compromise for me. I had not yet gotten the garage set up, and many of my tools and materials were still packed away. This time I had most everything out and ready to use. I treated this as an exercise in patience and intention. Every step was carefully considered, and if I screwed something up (which was often) I did it over again instead of hacking it together. I wanted to try and build something that looked as if it would have been right at home in an early laboratory, so that meant it had to look handmade, but also polished and "engineered". Every decision was made based upon functionality, and I tried very hard to avoid any kind of ornament or decoration. Although I would really have appreciated the milling machine I left in Philadelphia, I was pleasantly surprised with how much I could do just using my drill press, band saw, and hand tools.
I started by building a frame from scraps of reclaimed Douglas fir from a local architectural salvage place. I have completely fallen in love with stuff. It is everywhere out here, and I really enjoy working with it.
The next step was to start laying out bit and pieces of ink jet and scanner hardware. I was looking for a good pair of stepper motors that I could use as X and Y axis drivers. I have lots of these so it was not too hard to find two that would work together, I also dug out a pile of polished steel rods (also from printers and scanners) and some linear bearings that originally held the print heads of an ink jet.
The x-axis is almost a complete steal from an old scanner with the ink jet linear slide being the only addition. I made up a brass plate to ride on the x-axis and hold the y-axis motor and rod assembly. The y-axis is all custom made with bits and pieces from aho knows how many other machines. It was fun to machine up the various fittings I needed for keeping everything in place (even though I ended making many of them at least twice).
Brass was my material of choice as it is easy to work, and it looks great with the warm color of the Fir. I was initially very concerned with how to manage the wires. I considered lacing them, but in the end I made long brass springs out of fine wire and slid the wires through them. They look amazing (if I do say so).
All of the materials, and most of the screws and fasteners are from other things I have taken apart or collected. I think that at most I spent $30 for materials, much of it on the phosphorescent paint. A few coats of shellac gives the fir a perfect "old school" finish, and adds to the antique feel. Once done I turned it over to Bob to write the code. He managed to build quite a sophisticated system in just a few days. I will let him describe it (hopefully) but I know he took his inspiration from the old logo turtle graphics and built a parser that can read simple "programs" to draw the patterns. Here is a video he took at the opening, and if you are impatient skip ahead to about 1:11 to see it start drawing one of the 6-7 patterns it draws at random. Bob refers to this one as "triangle 90", but I call it "Iron cross". Bear in mind, it is called SlowLight for a reason...
Friday, November 13, 2009
Arduino PID library in the playground
I just found out that user br3ttb created a very useful looking PID library for the Arduino.
I had considered turning my hacked together code into a library, but never got to the point where I thought I could pull it off.
This should definitely make it easier to test various physical setups as it will standardize the software to a great extent. I can't wait to try it out with a real project. I even have one!
Tuesday, November 10, 2009
next show
Last summer I worked with Bob Gallup on a piece for the Dorkbot Seattle show People Doing Strange Things With Electricity IV. We built a driftwood and steel sculpture inspired by sea urchins called Flotsam. Coming in January is a Dorkbot related show at a gallery/bar in Capitol Hill, and we are going to try collaborating again. This show has a "winter lights" theme, and we have some cool ideas for a slow scanning image display. The biggest challenge may well turn out to be my unheated garage, but I hope getting started soon will let me avoid the coldest months. The show opens in January and there is lots to do!
Thursday, August 06, 2009
Architectural salvage, a cautionary tale.
We love old stuff around here. Part of it is our interest in reduce/reuse/recycle, but more honestly, we just like old stuff. Something about the history embedded in collected bits of the past makes them feel special. We also love shopping for them at Seattle's trio of great architectural salvage stores:
1. Second Use (South Park)
2. EarthWise (SODO)
3. Restore (Ballard)
We can spend an entire day wandering around and looking at all the treasures they have saved from the dustbin. In fact, for our recent wedding anniversary, that is exactly what we did. Three salvage stores, lunch at Paseo, groceries from the Pike Place Market, and an amazing steak dinner. Perfect!
So when we started planning for our raised bed garden in the little strip next to the garage it was natural to say "lets see what we can get at Second Use" if only because it is right around the corner (almost) and we don't need much of an excuse to go there. We found that they had a huge assortment of glazed terracotta facade tiles from an old apartment building. These had been around for awhile, and had slowly been coming down in price until they were $2.00 each. They were just what we were looking for and, at that price, were cheaper then anything new. It took about 4 trips (in the CRV) to load and move the 40 or so tiles we needed, but as soon as we got them home Rae got to work cleaning and moving them into place.

She spent most of two days working on them.
Just when they were all in place, and we were about to start sifting in the dirt, she said "there is nothing we should be worried about in using these, right?".
Oops.
Once asked, it occurred to me that they might have a lead based glaze. A quick trip to the hardware store for a lead test kit and several repeated tests later revealed the sad truth. At least some of the tiles tested strongly for lead. I am still not sure if the results are based upon the glaze (since some did and some didn't). My other theory is that many years of exposure to lead carrying auto exhaust had befouled them. Either way, we were not going to grow tomatoes in them.
Rae was sad, really sad. So I scooted off to the friendly local lumber yard (Alki Lumber, GREAT place!) and bought enough cedar to rebuild the beds. Rae carted all the tiles away, and we quickly screwed together replacements.
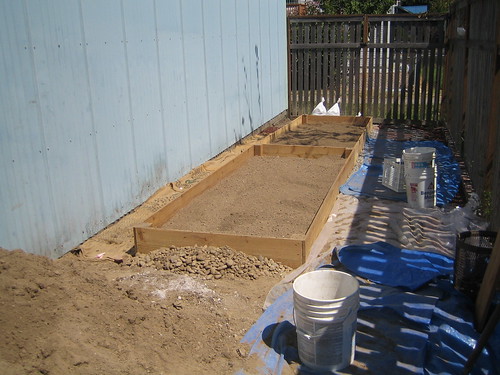
Not nearly as pretty, but at least the veggies won't poison us.
The lesson here is obvious, be careful! Oh, yeah, and think ahead.
When I called to let them know about the lead, the good folks at Second Use offered to take back the blocks. We kept them because we really like the way they look. We will eventually figure out what to do with them, but for now they are exiled to the front yard where they line the fence and collect weeds.

1. Second Use (South Park)
2. EarthWise (SODO)
3. Restore (Ballard)
We can spend an entire day wandering around and looking at all the treasures they have saved from the dustbin. In fact, for our recent wedding anniversary, that is exactly what we did. Three salvage stores, lunch at Paseo, groceries from the Pike Place Market, and an amazing steak dinner. Perfect!
So when we started planning for our raised bed garden in the little strip next to the garage it was natural to say "lets see what we can get at Second Use" if only because it is right around the corner (almost) and we don't need much of an excuse to go there. We found that they had a huge assortment of glazed terracotta facade tiles from an old apartment building. These had been around for awhile, and had slowly been coming down in price until they were $2.00 each. They were just what we were looking for and, at that price, were cheaper then anything new. It took about 4 trips (in the CRV) to load and move the 40 or so tiles we needed, but as soon as we got them home Rae got to work cleaning and moving them into place.
She spent most of two days working on them.
Just when they were all in place, and we were about to start sifting in the dirt, she said "there is nothing we should be worried about in using these, right?".
Oops.
Once asked, it occurred to me that they might have a lead based glaze. A quick trip to the hardware store for a lead test kit and several repeated tests later revealed the sad truth. At least some of the tiles tested strongly for lead. I am still not sure if the results are based upon the glaze (since some did and some didn't). My other theory is that many years of exposure to lead carrying auto exhaust had befouled them. Either way, we were not going to grow tomatoes in them.
Rae was sad, really sad. So I scooted off to the friendly local lumber yard (Alki Lumber, GREAT place!) and bought enough cedar to rebuild the beds. Rae carted all the tiles away, and we quickly screwed together replacements.
Not nearly as pretty, but at least the veggies won't poison us.
The lesson here is obvious, be careful! Oh, yeah, and think ahead.
When I called to let them know about the lead, the good folks at Second Use offered to take back the blocks. We kept them because we really like the way they look. We will eventually figure out what to do with them, but for now they are exiled to the front yard where they line the fence and collect weeds.
Subscribe to:
Posts (Atom)